
Showing posts with label wool. Show all posts
Showing posts with label wool. Show all posts
Sunday, January 1, 2017
Clad In Plaid! - A Wool Mini With Side Button Detail
Today I'm sharing a wool skirt I finished several weeks ago that was suppose to be a fast and easy palate cleanse, but of course it wasn't. Fast and easy NEVER work out for me. Why do I ever think they will?! I can't even blame the pattern or the fabric this time. Nope, just me being picky and wanting to get it exactly right.


Wednesday, December 28, 2016
Brown + Hot Pink Double-Breasted Jacket
The only thing good about cold weather is cute outerwear.
I say this every year because I really don't like winter but I really do like coats. They make it bearable, and I have a number of them. You can never have too much outerwear IMO. Yes I live in south Texas. Having a nice wardrobe means being prepared for any occasion and that includes weather.

Sunday, December 18, 2016
McCall's 7194 - Borderprint Sweaterknit Top w/ Asymmetrical Hemline
The temperatures outside have dropped dramatically. Time to break out the wool sweater knits! This fabric fades from dark gray to marbled red and back again, and I knew I wanted something simple to showcase it. I chose McCall's 7194, which I'd seen several awesome versions of last winter.


Friday, November 25, 2016
Butterick 6409 - Black + white geometric print dress in wool rayon
I am currently on the hunt for thicker-weight fabrics with draping properties to make winter dresses out of. This Marc Jacobs border print wool-rayon woven from Mood Fabrics caught my eye because I know rayon fabrics to have a great amount of drape and combined with wool I thought it would be perfect for winter. Also border print fabrics are fun to work with. I used Butterick 6409 for the pattern and made a few minor tweaks.

There are lots of ways to use this fabric creatively because it has a thick border on one side and a thinner one on the other. It also has areas of plain black along the selvages. I used the top half of the thick border for the bottom of my dress and the very bottom of the thick border for the sleeve cuffs. With the smaller border I made a belt.

This stuff sewed and pressed like a dream. It really is the perfect weight for winter, especially if you want to forgo a lining. If Mood had other patterns or colors I would snap them up in a heartbeat. The color is kind of a dusty black and can look like a midnight navy in certain lighting.

I cut a size small for this dress and I'm typically a 12 in big 4 woven patterns. The fit is perfect - not too much fabric through the bust with a bit of ease in the shoulders. I also really like the sleeves. Sometimes these types of sleeves have too much fabric in them but these have just the right amount. I left off the button and lapping cuff. That's just extra work when the cuffs fit easily over my hands.

This design relies on a drawstring for its shaping through the body but I find those to be kind of a pain and take too much re-adjusting throughout the day. Instead I used the casing pattern piece and made an elastic waist.
Dressform pictures:


I planned to wear a belt with it but I tried on every belt in my closet and didn't like any of them. I then thought I might add the tie back in to the front but I never need bulky stuff going on around my middle. Somewhere along the line the idea to make a fabric belt popped into my mind and I LOVE how it turned out. Now I want to make fabric belts for everything.

I used french seams throughout because they're pretty and there weren't that many construction joints anyway. The hem I did by hand as I usually do. The stitches for that completely sunk into the fabric so I decided to secure the neck facing by hand instead of top-stitching it down.


There are lots of ways to use this fabric creatively because it has a thick border on one side and a thinner one on the other. It also has areas of plain black along the selvages. I used the top half of the thick border for the bottom of my dress and the very bottom of the thick border for the sleeve cuffs. With the smaller border I made a belt.

This stuff sewed and pressed like a dream. It really is the perfect weight for winter, especially if you want to forgo a lining. If Mood had other patterns or colors I would snap them up in a heartbeat. The color is kind of a dusty black and can look like a midnight navy in certain lighting.

I cut a size small for this dress and I'm typically a 12 in big 4 woven patterns. The fit is perfect - not too much fabric through the bust with a bit of ease in the shoulders. I also really like the sleeves. Sometimes these types of sleeves have too much fabric in them but these have just the right amount. I left off the button and lapping cuff. That's just extra work when the cuffs fit easily over my hands.

This design relies on a drawstring for its shaping through the body but I find those to be kind of a pain and take too much re-adjusting throughout the day. Instead I used the casing pattern piece and made an elastic waist.
Dressform pictures:


I planned to wear a belt with it but I tried on every belt in my closet and didn't like any of them. I then thought I might add the tie back in to the front but I never need bulky stuff going on around my middle. Somewhere along the line the idea to make a fabric belt popped into my mind and I LOVE how it turned out. Now I want to make fabric belts for everything.

I used french seams throughout because they're pretty and there weren't that many construction joints anyway. The hem I did by hand as I usually do. The stitches for that completely sunk into the fabric so I decided to secure the neck facing by hand instead of top-stitching it down.


I love to wear these types of dresses in my day-to-day life and am thrilled with this new addition to my closet. When it gets a little cooler I'll pair it with tights and flats and be perfectly warm.

Note: The fabric used in this post was purchased with my Mood Fabrics monthly allowance, as part of my participation in the Mood Sewing Network.
Sunday, November 6, 2016
Vogue 9183 - Winter white wool dress w/ black lace overlays
I've just finished a classy wool dress for fall/winter that I'm in love with! The idea for this garment has been floating around my brain for years and I'm just so pleased to see it turn out exactly how I imagined.

I knew I wanted to play around with lace motifs and needed a lace that I could cut into that wouldn't fray. The one I used is from Mood fabrics and is all sold out but here is a black 3D guipure lace that's similar. The white is an ivory wool twill also from Mood fabrics and also all sold out. (Sorry!) Mood as lots of other wool twills available. Their anemone red is a particularly beautiful color that would go great with black lace.

The pattern I used is Vogue 9183. It's a simple shift dress that's fitted through the bust and skims over the waist and hips. I was intrigued by the neckline of this design and the absence of side seams. I did not make a muslin first as I figured it wouldn't need much fitting past the bust. I cut a size 12 through the bust and waist, tapering out to a 14 through the hips. Thankfully it fit without needing any adjustments.

To make this dress I sewed the ivory wool body pieces together first and put in the zipper. Then I put the dress on my dress form and figured out how I wanted the front lace piece to lay. When it was completely pinned on I took it off the dress form and slowly stitched the lace on by hand with millions of tiny stitches. I went all around the perimeter of the lace and did some stitching in the middle as well. When that was finally done I put it back on my dress form and repeated the process for the second lace piece. Then I had to figure out the lining because this patten is unlined. Usually putting in a lining just involves using the provided bodice pieces but since this dress has a neck facing that's folded over and incorporated into the design, the lining was no picnic.

Dressform pictures:


Here's a closeup of the neckline. I think it looks kind of 60s mod.

I used an antique white china silk for the lining.

The sleeve head seams were covered in bias tape for a clean finish.

This dress took forever to complete! I actually thought I'd finished it a few weeks ago and posted it to the Mood Sewing Network for October. However, the more I looked at those pictures the more I felt like something was off. Every once in awhile I'll change my mind about an aspect of my sewing after I see it photographed, and for this dress it was the sleeve length. Perhaps elbow-length sleeves just aren't flattering on my body or maybe something was off with the proportions. I'm not sure. I cut the sleeves off to the shorter length and trimmed a bit of the sleeve head along the way. I like this sleeve length much better. I'm still not completely satisfied with how the sleeves look from the back of the dress but I am moving on. And trying to not be obsessive. That's hard for a perfectionist.
Note: All fabrics used in this garment were purchased with my Mood Fabrics monthly allowance, as part of my participation in the Mood Sewing Network.

I knew I wanted to play around with lace motifs and needed a lace that I could cut into that wouldn't fray. The one I used is from Mood fabrics and is all sold out but here is a black 3D guipure lace that's similar. The white is an ivory wool twill also from Mood fabrics and also all sold out. (Sorry!) Mood as lots of other wool twills available. Their anemone red is a particularly beautiful color that would go great with black lace.

The pattern I used is Vogue 9183. It's a simple shift dress that's fitted through the bust and skims over the waist and hips. I was intrigued by the neckline of this design and the absence of side seams. I did not make a muslin first as I figured it wouldn't need much fitting past the bust. I cut a size 12 through the bust and waist, tapering out to a 14 through the hips. Thankfully it fit without needing any adjustments.

To make this dress I sewed the ivory wool body pieces together first and put in the zipper. Then I put the dress on my dress form and figured out how I wanted the front lace piece to lay. When it was completely pinned on I took it off the dress form and slowly stitched the lace on by hand with millions of tiny stitches. I went all around the perimeter of the lace and did some stitching in the middle as well. When that was finally done I put it back on my dress form and repeated the process for the second lace piece. Then I had to figure out the lining because this patten is unlined. Usually putting in a lining just involves using the provided bodice pieces but since this dress has a neck facing that's folded over and incorporated into the design, the lining was no picnic.

Dressform pictures:


Here's a closeup of the neckline. I think it looks kind of 60s mod.

I used an antique white china silk for the lining.

The sleeve head seams were covered in bias tape for a clean finish.

This dress took forever to complete! I actually thought I'd finished it a few weeks ago and posted it to the Mood Sewing Network for October. However, the more I looked at those pictures the more I felt like something was off. Every once in awhile I'll change my mind about an aspect of my sewing after I see it photographed, and for this dress it was the sleeve length. Perhaps elbow-length sleeves just aren't flattering on my body or maybe something was off with the proportions. I'm not sure. I cut the sleeves off to the shorter length and trimmed a bit of the sleeve head along the way. I like this sleeve length much better. I'm still not completely satisfied with how the sleeves look from the back of the dress but I am moving on. And trying to not be obsessive. That's hard for a perfectionist.
Note: All fabrics used in this garment were purchased with my Mood Fabrics monthly allowance, as part of my participation in the Mood Sewing Network.
Saturday, September 17, 2016
Vogue 9154 - Textured wool skirt
Finding wool clothing in south Texas is just about impossible. Of course our winters are pretty mild and don't last half the year, but it does get cold here. Well, cold to me anyway. If I want wool clothing I have to make it myself, which I am perfectly okay with as it's always such a well behaved fabric. I am really into textures lately, so when I spotted this striped novelty wool-acrylic blend at Moodfabrics.com, I quickly bought 1.5 yards without anything in mind.

I decided to use Vogue 9154 and make the knee length version of the skirt. I really like the way the stripes come together in chevrons at CF and CB, and horizontally on the sides. The yoke has interesting seam lines as well, although those can not be easily seen with this fabric. I'm definitely making one of the longer views in the near future in a solid color to show them off better. Perhaps I'll add some topstitching as well.

This fabric might look striped from a distance but it's actually rows of yarn secured to an olive green backing. It's a fun texture that doesn't add much bulk. I'm really not sure how much acrylic content this fabric has. I was about to sweat to death while taking these pictures, so rest assured it is really warm. This wool pressed really well but it is somewhat thick to sew with. I had to wrangle it under my machine foot, but once in place it fed through easily. I sewed my seams using bright blue thread so that I could see it easily if I needed to rip it out. I also stitched all the seams with a 4mm stitch length.

I cut a straight size 12 and took a 1.5" hem instead of the 5/8" hem in the pattern directions. I like shorter skirts for winter when they'll likely be worn with tights. On my body, knee length skirts paired with tights make me look like I'm wearing my grandma's clothes. My maroon top was made this past January and is also wool. Can you see the perspiration forming on my forehead? Lol.

I have found that skirts without waistbands tend to slip around when worn over tights, so I wanted something on the inside that had a little gripping power. I chose a cobalt blue tricot lining from my stash for the inside facing. In order to give the waist some stability and prevent it from stretching out, I added clear elastic to the seamline. Early on I realized I was not going to be able to finish the seams with my typical overlocking stitch, so I cut strips of the tricot and did a Hong Kong finish instead. I also finished off the bottom hem the same way.

Although my camera is making this blue appear much brighter then it is in person, I quite like the pop of color on the inside. I'm also going to explore making more unlined sweater knits now that I know how to neatly finish off the edges.
Note: This fabric was purchased with my Mood Fabrics monthly allowance, as part of my participation in the Mood Sewing Network.
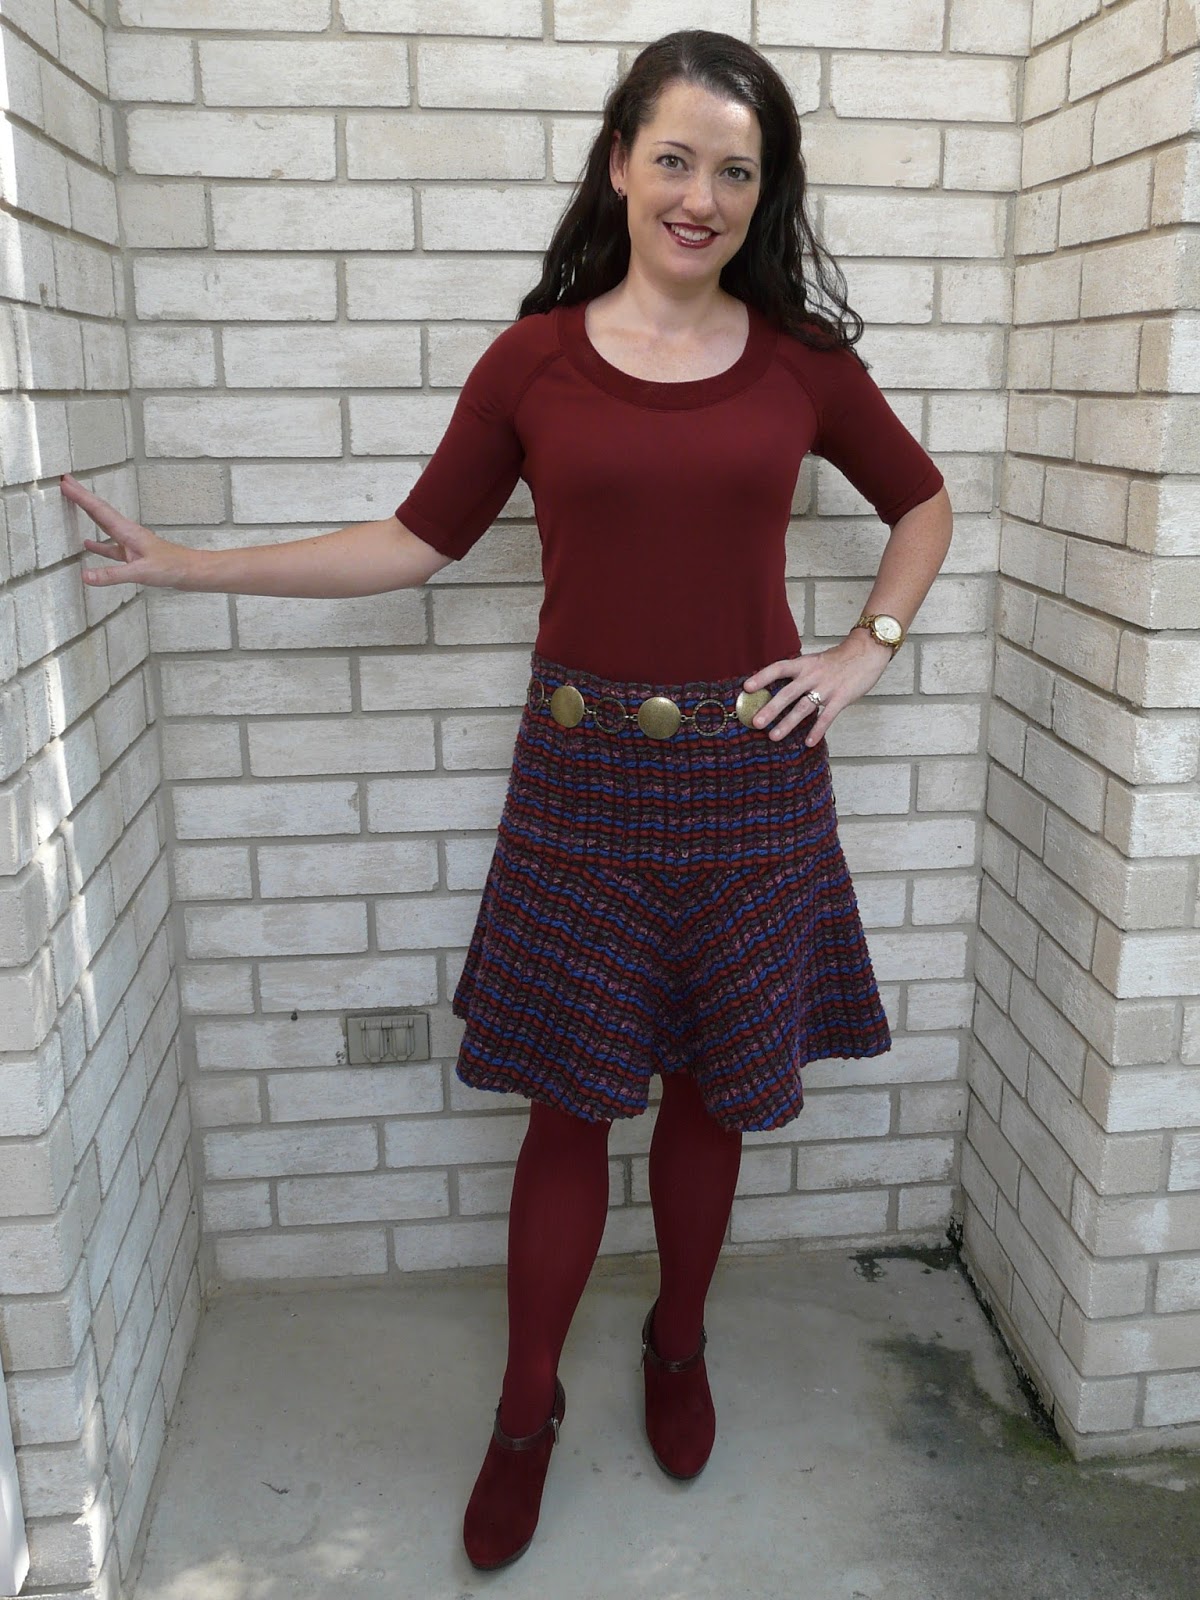
I decided to use Vogue 9154 and make the knee length version of the skirt. I really like the way the stripes come together in chevrons at CF and CB, and horizontally on the sides. The yoke has interesting seam lines as well, although those can not be easily seen with this fabric. I'm definitely making one of the longer views in the near future in a solid color to show them off better. Perhaps I'll add some topstitching as well.

This fabric might look striped from a distance but it's actually rows of yarn secured to an olive green backing. It's a fun texture that doesn't add much bulk. I'm really not sure how much acrylic content this fabric has. I was about to sweat to death while taking these pictures, so rest assured it is really warm. This wool pressed really well but it is somewhat thick to sew with. I had to wrangle it under my machine foot, but once in place it fed through easily. I sewed my seams using bright blue thread so that I could see it easily if I needed to rip it out. I also stitched all the seams with a 4mm stitch length.

I cut a straight size 12 and took a 1.5" hem instead of the 5/8" hem in the pattern directions. I like shorter skirts for winter when they'll likely be worn with tights. On my body, knee length skirts paired with tights make me look like I'm wearing my grandma's clothes. My maroon top was made this past January and is also wool. Can you see the perspiration forming on my forehead? Lol.

I have found that skirts without waistbands tend to slip around when worn over tights, so I wanted something on the inside that had a little gripping power. I chose a cobalt blue tricot lining from my stash for the inside facing. In order to give the waist some stability and prevent it from stretching out, I added clear elastic to the seamline. Early on I realized I was not going to be able to finish the seams with my typical overlocking stitch, so I cut strips of the tricot and did a Hong Kong finish instead. I also finished off the bottom hem the same way.

Although my camera is making this blue appear much brighter then it is in person, I quite like the pop of color on the inside. I'm also going to explore making more unlined sweater knits now that I know how to neatly finish off the edges.
Note: This fabric was purchased with my Mood Fabrics monthly allowance, as part of my participation in the Mood Sewing Network.
Sunday, January 31, 2016
Vogue 1389 again - Maroon wool knit baseball top
I am continuing to enjoy using up fabric from my scrap pile and making tops. Here is my latest creation from Vogue 1389, a Donna Karan designer pattern.

I first made this pattern back in December and it has seen lots of wear during this mild winter, so I decided to make another one using up a big scrap of maroon wool knit. Four LONG years ago (before I had many gray hairs - sob!) I used this fabric for a top with a draped neckline and wore it for Christmas. It was donated a year or so later because I really hate to wear anything fussy around my neck. But the fabric was perfectly lovely and I'm glad I had a big piece of it to make something that will actually get some wear.

This time I used an exposed seam detail throughout the shirt and love the outcome. It is achieved by stitching the pieces together with the wrong sides facing it, then ironing them flat and topstitching from the outside about 1/8" on either side of the seam. Then I carefully cut away the excess fabric. It looks really cool on fabrics with a terry like texture on the inside.

This is a very fitted pattern. Where I usually size down to a 10 on knits, I cut a straight size 12. I also dropped the armholes an inch like last time, as they are drafted really high. The sleeve bands were thick and dumpy looking so I oped to hem the sleeves right above the elbow. All hems were sewn with a wide set twin needle.

The neckline stretched out a bit when I was making this top so I sprayed it with water and threw it in the dryer with a damp towel. Twenty minutes later I took it out and the neckline had shrunk to a point where it lays nice and flat against my chest.

Even though I'm an Aggie I don't really own a ton of maroon stuff. Well, now I've got a least one top to wear with this cap. Whoop! Also Gig 'em.

I first made this pattern back in December and it has seen lots of wear during this mild winter, so I decided to make another one using up a big scrap of maroon wool knit. Four LONG years ago (before I had many gray hairs - sob!) I used this fabric for a top with a draped neckline and wore it for Christmas. It was donated a year or so later because I really hate to wear anything fussy around my neck. But the fabric was perfectly lovely and I'm glad I had a big piece of it to make something that will actually get some wear.

This time I used an exposed seam detail throughout the shirt and love the outcome. It is achieved by stitching the pieces together with the wrong sides facing it, then ironing them flat and topstitching from the outside about 1/8" on either side of the seam. Then I carefully cut away the excess fabric. It looks really cool on fabrics with a terry like texture on the inside.

This is a very fitted pattern. Where I usually size down to a 10 on knits, I cut a straight size 12. I also dropped the armholes an inch like last time, as they are drafted really high. The sleeve bands were thick and dumpy looking so I oped to hem the sleeves right above the elbow. All hems were sewn with a wide set twin needle.

The neckline stretched out a bit when I was making this top so I sprayed it with water and threw it in the dryer with a damp towel. Twenty minutes later I took it out and the neckline had shrunk to a point where it lays nice and flat against my chest.

Even though I'm an Aggie I don't really own a ton of maroon stuff. Well, now I've got a least one top to wear with this cap. Whoop! Also Gig 'em.
Tuesday, December 1, 2015
Vogue 8946 - Fuschsia wool ponte dress
Ponte knit is a well known and much loved fabric amongst the sewers of
the world. It’s beefy and stable qualities make it a great option for
body-con dresses and structured designs. I’ve sewn with my fair share of
it over the years and, as with most fabrics, there is a spectrum of
quality available. When I spotted this “fuchsia rose wool ponte knit” on
Mood Fabric’s website some months ago, I snapped it up faster then
lightning. I adore natural fibers and was positive that a ponte knit
made from wool would be heaven to work with. Unfortunately many other
people must have been as intrigued as I was since it sold out in record
speed. However, here is a neat striped jersey knit that I’ve had my eye on for awhile that looks to be similar, and I currently have this plaid ponte in my stash awaiting the perfect pattern pairing.

The fabric was 60″ wide so I purchased my standard I-don’t-know-what-I’m-going-to-make-with-this length of 2 yards and went combing through my extensive pattern stash. Vogue 8946 immediately jumped out at me. The pleating details would really sing in a solid color and the long sleeve version would be perfect for winter.

I did a bit of pattern research and decided to cut my typical Vogue woven pattern size of 12. Usually I will go down a size for anything made in a knit fabric but this dress was described as close-fitting and it certainly is. After I got the fronts pleated and the top sewn to the bottom, I pinned it on my dressform and used liberal amounts of steam to get the pleats to lay nicely. This is where using a wool really worked out. It was simple to manipulate and took the shape of my dressform easily.

This pattern calls for a back zipper and, even though I was working with a knit, I did my best to follow the instructions. I do prefer a zipper in dresses as I often do my hair and makeup before getting dressed and they’re just easier to put on and not get smeared with deodorant or powder. I fused some knit interfacing along the center back and made several passes at zipper insertion. Every Single Time the bottom stuck out like a tail until I finally admitted defeat and did away with it.


The body of this dress is fully lined in black tricot from my stash. Vogue included a separate front pattern piece for the lining, which I always appreciate. Apologies for the dark pictures. We haven't had much sun around these parts lately.

I finished all the wool seams with the overlocking stitch on my machine. I don't think the edges would have unraveled much, but they did change in appearance when they came in contact with my iron. Better safe than sorry.

I took a 1.5″ hem instead of the narrow hem the directions call for. I slip-stitched it by hand onto the tricot knit lining. I also slip-stitched the sleeve hems by hand but not onto lining as I left the sleeves unlined.

Hurray! Another long sleeve dress to add to my wardrobe! That brings my total up to 5, not including my funeral dress or sweater dresses. I have other dresses I consider winter appropriate, but most are 3/4 sleeves or shorter - not sure why. Anyway, I do want to use this pattern again for a sleeveless summer version but I’ll definitely be adding some length to the hemline. I like the shorter length for tights and boots but probably not for bare legs.
Note: This fabric was purchased with my Mood Fabrics monthly allowance, as part of my participation in the Mood Sewing Network.

The fabric was 60″ wide so I purchased my standard I-don’t-know-what-I’m-going-to-make-with-this length of 2 yards and went combing through my extensive pattern stash. Vogue 8946 immediately jumped out at me. The pleating details would really sing in a solid color and the long sleeve version would be perfect for winter.

I did a bit of pattern research and decided to cut my typical Vogue woven pattern size of 12. Usually I will go down a size for anything made in a knit fabric but this dress was described as close-fitting and it certainly is. After I got the fronts pleated and the top sewn to the bottom, I pinned it on my dressform and used liberal amounts of steam to get the pleats to lay nicely. This is where using a wool really worked out. It was simple to manipulate and took the shape of my dressform easily.

This pattern calls for a back zipper and, even though I was working with a knit, I did my best to follow the instructions. I do prefer a zipper in dresses as I often do my hair and makeup before getting dressed and they’re just easier to put on and not get smeared with deodorant or powder. I fused some knit interfacing along the center back and made several passes at zipper insertion. Every Single Time the bottom stuck out like a tail until I finally admitted defeat and did away with it.


The body of this dress is fully lined in black tricot from my stash. Vogue included a separate front pattern piece for the lining, which I always appreciate. Apologies for the dark pictures. We haven't had much sun around these parts lately.

I finished all the wool seams with the overlocking stitch on my machine. I don't think the edges would have unraveled much, but they did change in appearance when they came in contact with my iron. Better safe than sorry.

I took a 1.5″ hem instead of the narrow hem the directions call for. I slip-stitched it by hand onto the tricot knit lining. I also slip-stitched the sleeve hems by hand but not onto lining as I left the sleeves unlined.

Hurray! Another long sleeve dress to add to my wardrobe! That brings my total up to 5, not including my funeral dress or sweater dresses. I have other dresses I consider winter appropriate, but most are 3/4 sleeves or shorter - not sure why. Anyway, I do want to use this pattern again for a sleeveless summer version but I’ll definitely be adding some length to the hemline. I like the shorter length for tights and boots but probably not for bare legs.
 |
| Photo bombed again! |
Wednesday, October 21, 2015
Vogue 1265 - Pamella Roland maroon wool crepe dress
It only took an entire month for me to make but I finally have a new dress! This Pamella Roland pattern, Vogue 1265, came out in 2011 and I just loved it. It's such a fun design - all business in the front and party in the back. There are hardly any reviews for it on patternreview.com and it's now out of print. (Anyone else feel sorry for these types of designer patterns that are lovely but largely ignored?) The envelope gives it an average skill rating and it's not a really difficult thing to make, but there is a ton of fabric in the skirt and that part gets attached early. It's a lot to keep up with and work around.

I made a muslin of the body and front skirt, but not of the back flared skirt. Based on that I cut a size 10 in the front from the arms down, tapering out to a 12 through the waist. For the back I cut a 12 from the shoulders to the waist, and a 10 from the waist to the hips. The front darts had to be pulled in a bit as there wasn't much bust shaping underneath them. I shortened the front slit at least 2 inches for personal preference. It's really just a design element as you don't need it to be able to walk well. The fabric at the shoulders extended out a little too far, and I do not have narrow shoulders. I cut 1/2 inch from that area, tapering to nothing at the sleeve sides.
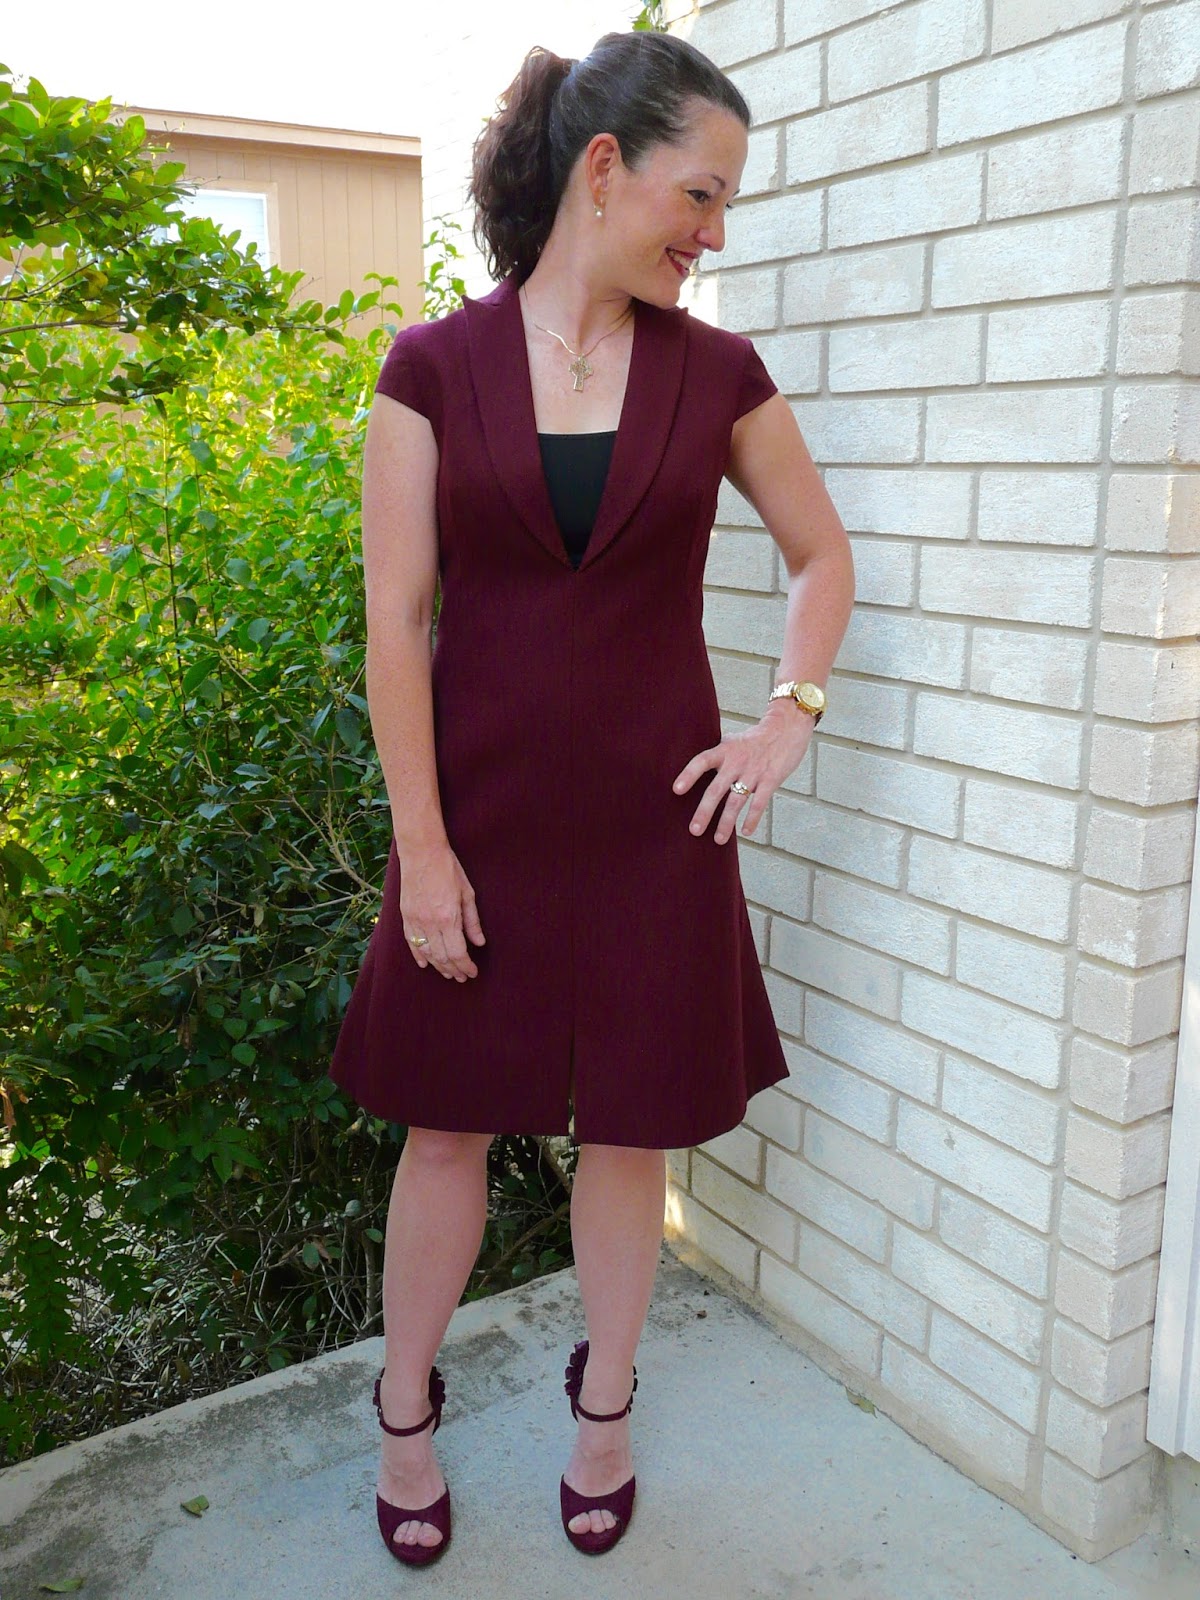
I bought the fabric online somewhere several years ago. It's a nice
weight wool crepe, which is always a well behaved fabric to work with. It drapes
and presses well. The lining is Ambiance purchased locally.

This back skirt was quite a bit of work. The instructions have you pin it to another piece of fabric and let the bias parts stretch for 24 hours. I then basted it the the back pieces, pinned it to my dressform, and marked the hemline as straight as I could. After I trimmed away the uneven bits of the crepe, I lined it up with the lining and trimmed the lining as needed. There is a double pleat at the center back and two pleats at either side back seam, making for an extremely full skirt. Because the lining is sewn to the bottom of the skirt, there is no hem to turn up and sew invisibly, THANK GOODNESS.

One thing the instructions call for is interfacing all of the dress body except for the back skirt and the sleeves. I was unsure of what this would look like and didn't want a really stiff dress. However, I went ahead and interfaced everything with a nice weight woven fusable and the result is a dress that holds its shape but is not stiff.

Obligatory twirling picture:

Dressform pictures:
(The lighting in my room is mostly indirect this time of year and this fabric really soaked it up. I had to use a flash and lighten these pictures up quite a bit. I'm sorry if they're hard to see.)


There is an invisible zipper down the left side, which I ordered in a matching maroon from NYC. You can see the slight color difference in the crepe and the lining. I really like when the lining peeks out at the hemline when I'm walking or sitting. It's subtle but adds interest to a solid colored garment.

Here you can see the front lining. I really like how the front facing extend down to the slit area along the hemline.

There was a bit of handstitching involved. Here I have sewn the back body lining down invisibly to the top of the back skirt lining.

I changed the sleeve insertion slightly. I won't go into a lot of detail but I ended up using bias tape to finish off the armhole and then stitched it invisibly by hand to the dress lining. I did a similar finish to the sleeves on this dress, oddly enough another Pamela Roland design. You can read about it on that post if you want.

I adore my new fall wardrobe addition. It has that heavy weighted feeling of an expensive garment, if you know what I mean. I have plans to make some sort of sequined or beaded top to wear underneath. Now, on to something that doesn't involve miles of fabric or tedious fitting tweaks!
Subscribe to:
Posts (Atom)