
Showing posts with label yellow. Show all posts
Showing posts with label yellow. Show all posts
Tuesday, February 7, 2017
African Wax Print Maxi Dress
For the month of January, the members of the Mood Sewing Network were given the opportunity to work with an African Wax Print, also know as Ankara fabric. I've never looked too closely at these fabrics. They come in such big quantities, and I've not needed 6 yards of anything for a garment, so I skipped right by them. When asked, though, I thought - why not? It might be fun to work with a new-to-me fabric. I chose the Gold and Dark Navy Waxed Cotton with Gold Metallic Foil, the one with the foil leaves. There is also the same colorway with peace signs in foil instead, if that is more your style. I did a ton of searching through google images and even created a board on my Pinterest account of garments made in this type of fabric. What I really wanted was a jacket and fitted pants combo, but I wasn't sure where I'd wear it, so decided on a maxi dress instead. I got out all my fabric hog patterns to choose from, in order to use as much of the yardage as possible.

Tuesday, February 23, 2016
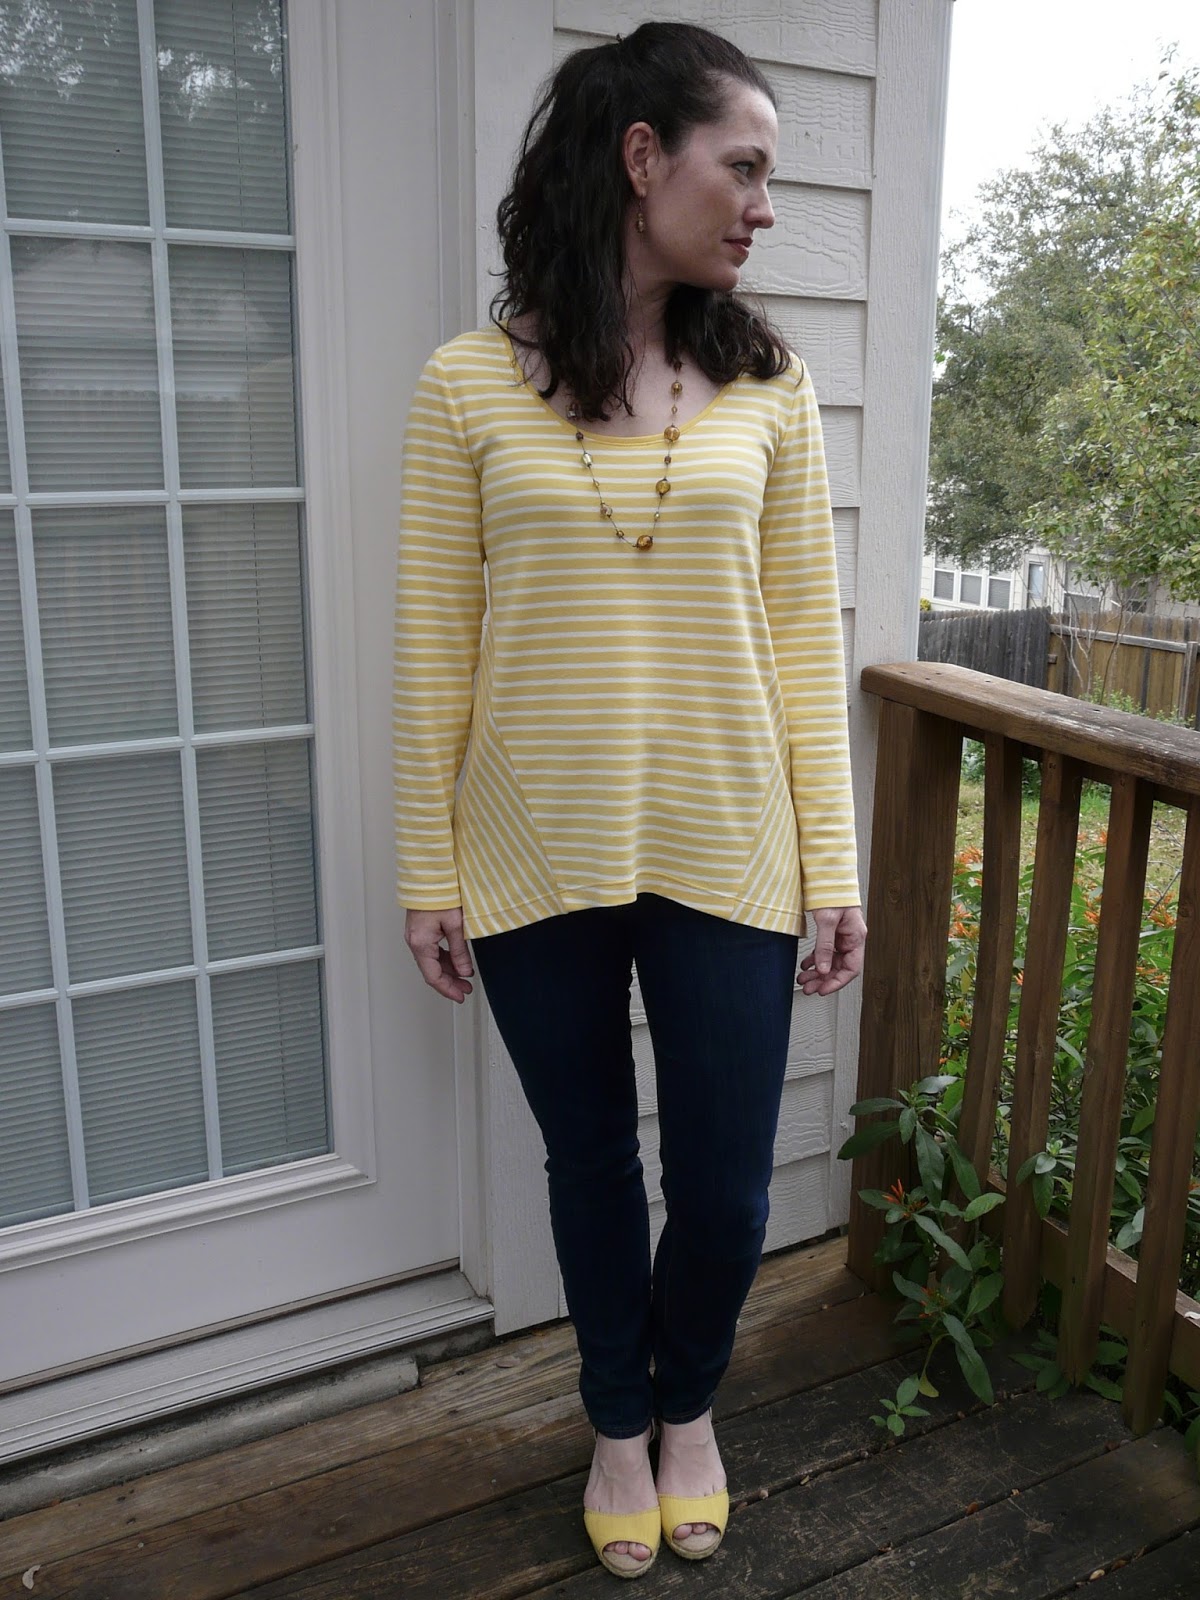
Vogue 8962 - Yellow striped long sleeve tunic
I am having so much fun making casual clothing lately! In the past I have mostly made fancier stuff and just purchased my casual clothing from stores. I still plan to make the really envolved garments, but you can expect to see a lot more everyday styles with interesting details on this blog in the coming months.

The pattern used is an OOP "Very Easy Vogue" pattern, 8962. I bought this pattern for the cowl neck view, which I cut out and sewed a number of years ago. At that time, unfortunately, I wasn't very knowledgeable about sewing with knits and picked a fabric that was too thin. This time around I used a nice weight yellow viscose ponte knit from Mood fabrics. I previously used this fabric in 2014 when I was pregnant for a maternity skirt. I knew then that I would need to make something more permanent in my closet and ordered another cut of it.

I cut the size 10 and it is loose but the bust fits nicely so I don't feel it is too big. My normal Vogue size is a 12, but I always go down one size for knits. I might go down to the 8 if I make this pattern again to tighten up the shoulder area.

Somehow I managed to cut the backs opposite of the example on Vogue's website. I also cut some off the bottom of the pattern the first time I made this, so I'm not sure how much shorter it is than it was drafted.

I modified the neckline from the directed 5/8" double folded hem to a folded piece of fabric cut on the straight grain. I folded it so that only the yellow is showing on the outside and topstitched with a 4 mm stitch length. I've figured out that this longer stitch length is the key to getting RTW looking results on knits, and also use it for the double needle stitching along the hemlines.

I was asked to show an inside picture of this type of neckline finish on my last top, so here it is. After topstitching on the outside, I graded the fabrics to lay as flat as possible on the inside. All other seams were finished with the overlocking stitch on my regular sewing machine.

Will I ever tire of the tunic with skinny pants silhouette? Probably not anytime soon. It's perfect for my mom-on-the-go lifestyle.
Here we have some photobombing children. Yes they are in shorts. We had the mildest winter in years and our current daily highs are in the 70s. It feels like heaven.

Note: This fabric was purchased with my Mood Fabrics monthly allowance, as part of my participation in the Mood Sewing Network.
Tuesday, March 10, 2015
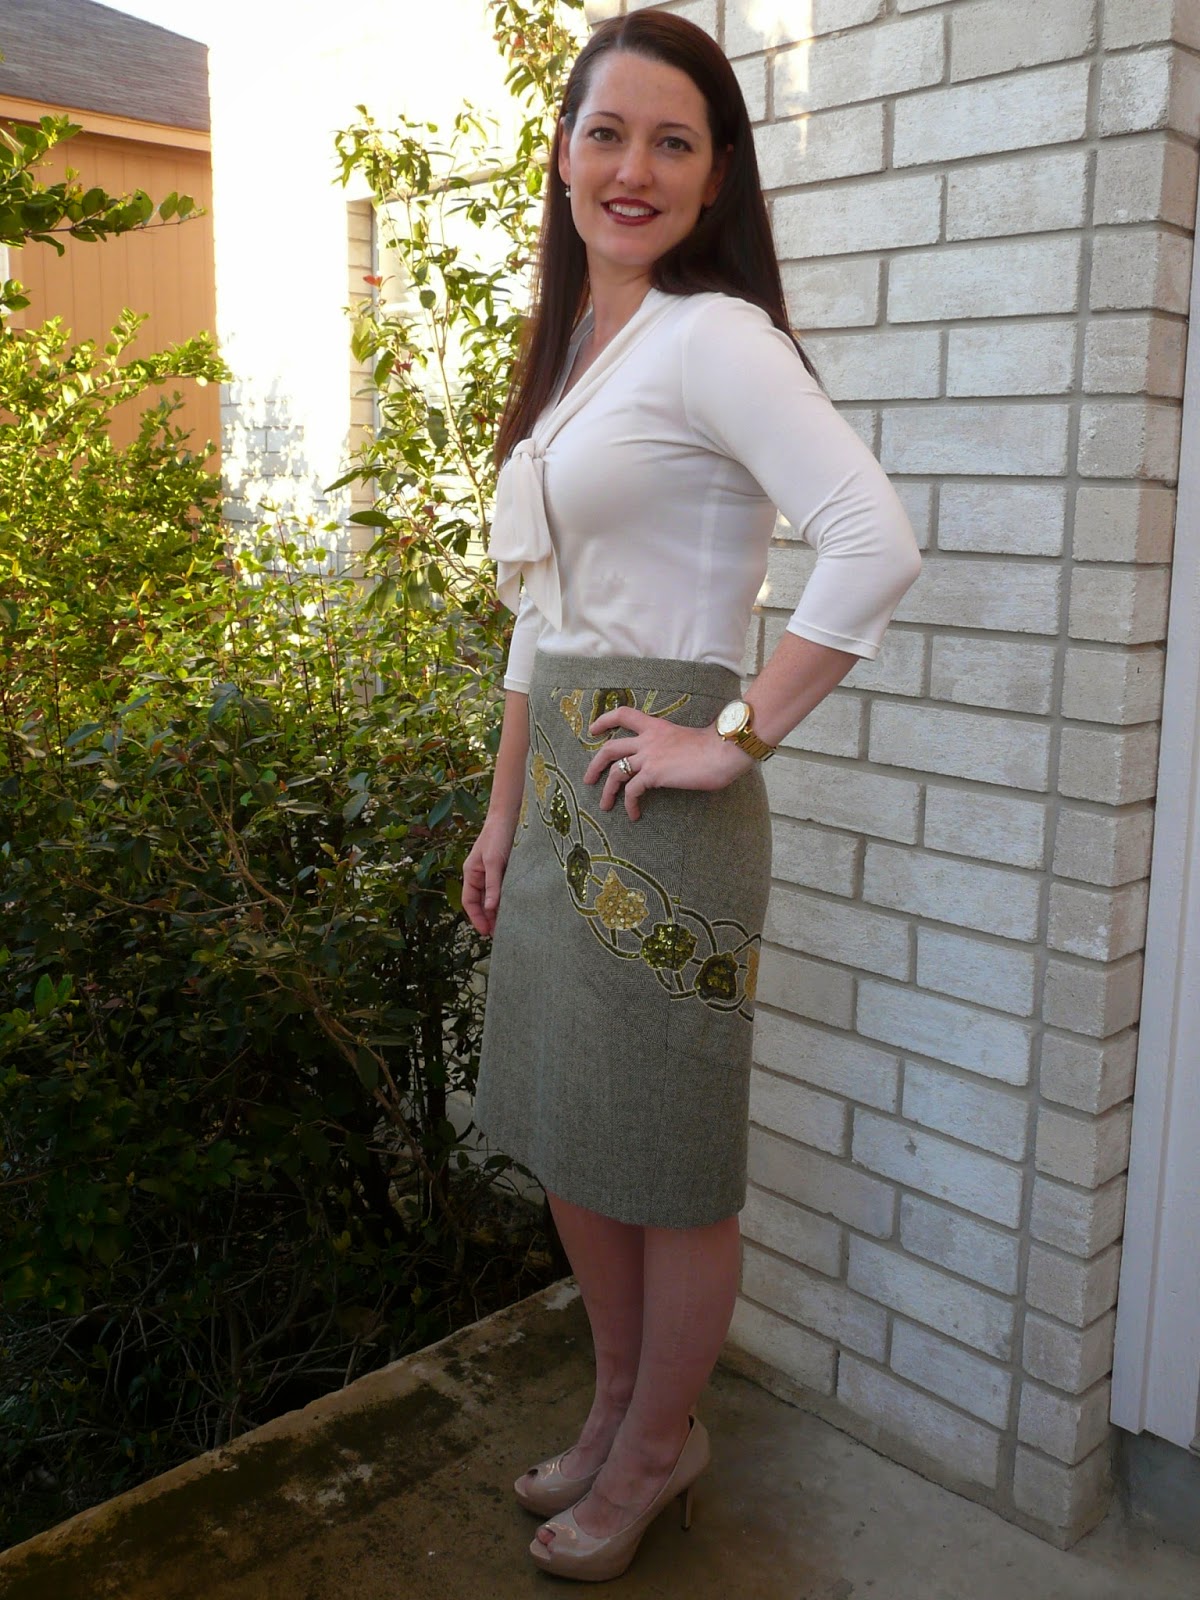
Vogue 1092 - Green wool sequined skirt
I found this interesting wool
on Mood Fabrics’ website by searching the word “sequins”. Wool,
sequins, embroidery, and flowers in yellow? That’s definitely my kind of
fabric. I knew it was wide with a sequined border on both edges, so I
only got a yard thinking I would make some sort of skirt. Making my TNT
straight skirt seemed too boring, so I went looking for a pattern where I
could use the sequined border in a more interesting manner. Enter this
OOP Tracy Reese pattern, Vogue 1092. I always gravitate to unusual
designs and absolutely loved the way this one was constructed.

I used the borders for the “bands” that criss-cross the front and continue onto the back and I had fabric fumes left over. If I’d gotten 1.5 yards I really could have matched the side seams perfectly. A fun feature of this design is that some of the pieces are cut on bias and some on straight grain. In a striped fabric it would be much more apparent then this herringbone, which just means I’ll have to make it up again.

I made a muslin and it fit well right out of the envelope in my normal size after a few tweaks to the waistband. I don’t usually go for skirts below my knees. A good bit of my height comes from my long torso, so I need my knees showing to avoid looking stumpy. However, I didn’t want to cut off the kick pleat with godet insert at the center back, so I kept it the original length.

The backs are cut on the bias enabling the front bands to wrap around to the back of the skirt. So fun! I'm wearing my ivory silk jersey top to complete the outfit.
This wool behaved very well and ironed beautifully. It is scratchy, though. I would not suggest using it without a lining or for a jacket with collar unless you like that scratchy wool feeling on your skin.
Dressform pictures:


Here’s a close-up of the kick pleat and the herringbone print. This was my first time making this type of detail and I quite like it! It looks kind of 40′s vintage to me.

The lining I made from a lovely dark olive silk charmeuse, also from Mood Fabrics. This fabric is just heavenly. I’m starting to realize not all silk charmeuse fabrics are created equally. Some is thin and cheap but this stuff is medium weight and just gorgeous. I’m thinking of getting some more yardage for a pretty night gown or other form of lounge wear.


I actually finished this skirt in mid February but every weekend since then it’s been overcast and rainy around here. Finally yesterday the sky brightened up a bit between rain storms and I was able to get some pictures taken. And now that it’s daylight saving time, I can get pictures during the week and not just on the weekends. Yet another reason to love spring and summer!
Note: Both fabrics were purchased with my Mood Fabrics monthly allowance, as part of my participation in the Mood Sewing Network.
I used the borders for the “bands” that criss-cross the front and continue onto the back and I had fabric fumes left over. If I’d gotten 1.5 yards I really could have matched the side seams perfectly. A fun feature of this design is that some of the pieces are cut on bias and some on straight grain. In a striped fabric it would be much more apparent then this herringbone, which just means I’ll have to make it up again.
I made a muslin and it fit well right out of the envelope in my normal size after a few tweaks to the waistband. I don’t usually go for skirts below my knees. A good bit of my height comes from my long torso, so I need my knees showing to avoid looking stumpy. However, I didn’t want to cut off the kick pleat with godet insert at the center back, so I kept it the original length.
The backs are cut on the bias enabling the front bands to wrap around to the back of the skirt. So fun! I'm wearing my ivory silk jersey top to complete the outfit.
This wool behaved very well and ironed beautifully. It is scratchy, though. I would not suggest using it without a lining or for a jacket with collar unless you like that scratchy wool feeling on your skin.
Dressform pictures:
Here’s a close-up of the kick pleat and the herringbone print. This was my first time making this type of detail and I quite like it! It looks kind of 40′s vintage to me.
The lining I made from a lovely dark olive silk charmeuse, also from Mood Fabrics. This fabric is just heavenly. I’m starting to realize not all silk charmeuse fabrics are created equally. Some is thin and cheap but this stuff is medium weight and just gorgeous. I’m thinking of getting some more yardage for a pretty night gown or other form of lounge wear.
I actually finished this skirt in mid February but every weekend since then it’s been overcast and rainy around here. Finally yesterday the sky brightened up a bit between rain storms and I was able to get some pictures taken. And now that it’s daylight saving time, I can get pictures during the week and not just on the weekends. Yet another reason to love spring and summer!
Note: Both fabrics were purchased with my Mood Fabrics monthly allowance, as part of my participation in the Mood Sewing Network.
Monday, July 7, 2014
Yellow + white ponte maternity skirt
All the maternity skirts currently available for sale fall into three
categories: black/navy/gray, denim or striped maxi. If you want any type
of bright color or pattern, you are out of luck. Or, if you know how to
sew, you make your own!

It was pretty much love at first site when I spotted this Theory yellow striped ponte at Mood Fabrics. It's yellow, is a ponte knit which is the perfect weight fabric for a skirt, and it's visually interesting with the stripes. I paired it with Burda 7023, labeled "super easy", and that was no lie. It only has two pieces, a little gathering, some elastic in the back, and a hem. This fabric stitched together beautifully and I had no problems matching the stripes along the side back seams.

This is another great Burda pattern with plenty of room for a growing bump. I can see this skirt fitting until the very end.

At the back I used 1.5" elastic and stitched it down along the the top on the inside and the bottom on the outside of the skirt fabric.

And that's pretty much it! If I can find more cute ponte knits I'll whip this skirt up again. I also may have purchased a few more yards of this yellow stripe for a dress for my more permanent non-maternity wardrobe, but don't hold your breath to see it anytime soon. ;)
It was pretty much love at first site when I spotted this Theory yellow striped ponte at Mood Fabrics. It's yellow, is a ponte knit which is the perfect weight fabric for a skirt, and it's visually interesting with the stripes. I paired it with Burda 7023, labeled "super easy", and that was no lie. It only has two pieces, a little gathering, some elastic in the back, and a hem. This fabric stitched together beautifully and I had no problems matching the stripes along the side back seams.
This is another great Burda pattern with plenty of room for a growing bump. I can see this skirt fitting until the very end.
At the back I used 1.5" elastic and stitched it down along the the top on the inside and the bottom on the outside of the skirt fabric.
And that's pretty much it! If I can find more cute ponte knits I'll whip this skirt up again. I also may have purchased a few more yards of this yellow stripe for a dress for my more permanent non-maternity wardrobe, but don't hold your breath to see it anytime soon. ;)
Sunday, May 4, 2014
Oliver + S Class Picnic Blouse & Shorts in yellow and blue
This is one of my very favorite Oliver + S patterns. I made the top last fall and lengthened it to a dress. Rachel never wore it, though, because I didn't like the fabrics I chose and it looked like a nightgown. The fit was perfect on her then, so I made the same size in blouse form. These coordinating fabrics are part of the Oliver + S for Moda line (now sold out) and were purchased from Fabric.com several years ago. I only purchased 1 yard of each but as clothing for little girls barely takes any yardage, I have lots left over to use in later years.

For the blouse I cut the 6-12 month for width and 2T for length. The sleeves were cut at the shortest size to be cool for summer. The shorts I knew needed to be cut at the 6-12 month for width but was uncertain what to cut for length. I ended up measuring the crotch length on Rachel, comparing that with the pattern, then cutting the 18-24 month for length.

I just love the design of this pattern! What other pattern company is making peasant-style tops or shorts with such cute details? Also, the construction techniques are different and really thoughtful (except in one particular head-scratching instruction noted below.)


Here you can see the top of the shorts and all the fun topstitching. I love the mock-fly front! The way the legs are finished with the edging is really interesting and leaves the edges neat and crisp. I'm planning to make a pair in denim with orange topstitching and the reverse side for the edging. Won't that be adorable?

I used the checked fabric for the inside yokes of the blouse and the bias strips at the sleeve tops for a bit of fun. You can see it peeking out when she moves around. The shorts are finished at the back with topstitching top and bottom to keep the elastic in place.

The pattern calls for the contrast fabric at the inside waistband which matches what I did on the blouse. All the raw edges were finished with my machine's over-locking foot. I deviated from the instructions by folding the seam allowance of the waistband up and slip-stitching it in place. Their way is fine, too, but I like the neat finish of this technique better. In a thicker fabric it would be too bulky but with these thinner cottons it works perfectly.

I chose not to topstitch the yokes along the gathered fronts but slip-stitched them down instead.

Okay, so my one complaint about this pattern is the width of the shorts edging around the curves and up to the waistband. It should be the same around the entire leg opening but in those locations it was 1/4" wider. I didn't notice this issue until I folded the edging to the front and was about to topstitch it down. I had to go back to cut away the excess, then refolded it to topstitch. The picture below is what it looked like before I trimmed away the extra width.

Here you can see where I corrected my pattern tracing for the next time I make these. The edges of the paper are curving up so it doesn't look congruent but it is.

As for the head-scratching instruction that I mentioned above, it came as a hint of what to do to obtain a nice curve at the outside of the edging. It tells you to first trim away the seam allowance to 1/8", then sew a gathering stitch around the curve to cinch up the seam allowance, then flip the facing to the outside and topstitch. I've never tried this method, so maybe I'm mistaken, but that seems like a sure fire way of ending up with bulky curves right at the front of the garment - especially if using some sort of heavier weight material like a denim. I always want to reduce bulk and make things lie smoothly, so instead I graded my seam allowances and cut little notches all along the curves. One thing my mom taught me to do is always grade my seams, and I am a Nazi about it. Nothing looks more happy-hands-at-home then lumpy edges.

I do think this is a fantastic pattern but for those two minor quibbles, and I love Rachel's new outfit. It's a little strange to see her in clothing that actually fits as I've gotten so use to seeing her in things that are too big and baggy.
Up next is a dress for me, in case you're tired of all these little girl garments and think I've abandoned sewing for myself. :)
For the blouse I cut the 6-12 month for width and 2T for length. The sleeves were cut at the shortest size to be cool for summer. The shorts I knew needed to be cut at the 6-12 month for width but was uncertain what to cut for length. I ended up measuring the crotch length on Rachel, comparing that with the pattern, then cutting the 18-24 month for length.
I just love the design of this pattern! What other pattern company is making peasant-style tops or shorts with such cute details? Also, the construction techniques are different and really thoughtful (except in one particular head-scratching instruction noted below.)
Here you can see the top of the shorts and all the fun topstitching. I love the mock-fly front! The way the legs are finished with the edging is really interesting and leaves the edges neat and crisp. I'm planning to make a pair in denim with orange topstitching and the reverse side for the edging. Won't that be adorable?
I used the checked fabric for the inside yokes of the blouse and the bias strips at the sleeve tops for a bit of fun. You can see it peeking out when she moves around. The shorts are finished at the back with topstitching top and bottom to keep the elastic in place.
The pattern calls for the contrast fabric at the inside waistband which matches what I did on the blouse. All the raw edges were finished with my machine's over-locking foot. I deviated from the instructions by folding the seam allowance of the waistband up and slip-stitching it in place. Their way is fine, too, but I like the neat finish of this technique better. In a thicker fabric it would be too bulky but with these thinner cottons it works perfectly.
I chose not to topstitch the yokes along the gathered fronts but slip-stitched them down instead.
Okay, so my one complaint about this pattern is the width of the shorts edging around the curves and up to the waistband. It should be the same around the entire leg opening but in those locations it was 1/4" wider. I didn't notice this issue until I folded the edging to the front and was about to topstitch it down. I had to go back to cut away the excess, then refolded it to topstitch. The picture below is what it looked like before I trimmed away the extra width.
Here you can see where I corrected my pattern tracing for the next time I make these. The edges of the paper are curving up so it doesn't look congruent but it is.
As for the head-scratching instruction that I mentioned above, it came as a hint of what to do to obtain a nice curve at the outside of the edging. It tells you to first trim away the seam allowance to 1/8", then sew a gathering stitch around the curve to cinch up the seam allowance, then flip the facing to the outside and topstitch. I've never tried this method, so maybe I'm mistaken, but that seems like a sure fire way of ending up with bulky curves right at the front of the garment - especially if using some sort of heavier weight material like a denim. I always want to reduce bulk and make things lie smoothly, so instead I graded my seam allowances and cut little notches all along the curves. One thing my mom taught me to do is always grade my seams, and I am a Nazi about it. Nothing looks more happy-hands-at-home then lumpy edges.
I do think this is a fantastic pattern but for those two minor quibbles, and I love Rachel's new outfit. It's a little strange to see her in clothing that actually fits as I've gotten so use to seeing her in things that are too big and baggy.
Up next is a dress for me, in case you're tired of all these little girl garments and think I've abandoned sewing for myself. :)
Monday, April 14, 2014
Oliver + S School Photo Dress in yellow
Just in time for Spring that is finally arriving in south Texas, I have made Rachel a new dress in that favorite hue of mine. I was waiting for what seemed like years for her to get big enough to fit into these patterns. She finally gained enough girth for them a year or so ago but I was still just lovingly gazing through my collection from time to time. Enough of that! It's time to get busy stitching them up before she gets too big!

The fabric is a nice weight cotton from Fabric.com, my favorite place to buy cottons for kids clothing. I have found that these quality cottons, priced between $7 and $10 per yard, wrinkle far less then the quilting cottons available locally. I don't know about your kids, but mine does not like to sit still and take care not to wrinkle her clothes. ;)

I love the details of this dress - the roll collar, kangaroo front pocket, slightly belled and cuffed sleeves, front yoke and princess seaming, full lining with separate pattern pieces that aren't a repeat of the outer dress. Most toddler dresses from the big 4 just aren't very detailed. I suppose most people who make kid clothing like simpler designs but I prefer a challenge. That's why I'm willing to pay the premium for these Oliver + S patterns.
Speaking of the kangaroo pocket:

Can you tell she loves it? She is definitely going to be a pocket person. As for sizing, I traced the 18-24 month size for the width and the 2T size for the length and got a perfect fit. This girl is tiny. In August she'll be 4. I'll probably be able to make her a fall version with just an inch or so added to the length and not have to re-trace the pattern.


The zipper I had to special order online from Zipper stop because I couldn't find a good match locally. The button peeking out on the left I happened to have in my stash. It is connected to the other side of the collar with a thread loop. The lining I did in white cotton sheeting from Hancock's fabrics. No pictures of that, though. It's too overcast today to take any interior shots.

This was such a fun little dress to make! I am still in a sewing funk for making stuff for myself but have a number of garments I want to make for her lined up. If you like seeing kids clothes on my blog then you are in for a treat. If not, well, sorry. I've got to go where my mojo takes me.
The fabric is a nice weight cotton from Fabric.com, my favorite place to buy cottons for kids clothing. I have found that these quality cottons, priced between $7 and $10 per yard, wrinkle far less then the quilting cottons available locally. I don't know about your kids, but mine does not like to sit still and take care not to wrinkle her clothes. ;)
I love the details of this dress - the roll collar, kangaroo front pocket, slightly belled and cuffed sleeves, front yoke and princess seaming, full lining with separate pattern pieces that aren't a repeat of the outer dress. Most toddler dresses from the big 4 just aren't very detailed. I suppose most people who make kid clothing like simpler designs but I prefer a challenge. That's why I'm willing to pay the premium for these Oliver + S patterns.
Speaking of the kangaroo pocket:
Can you tell she loves it? She is definitely going to be a pocket person. As for sizing, I traced the 18-24 month size for the width and the 2T size for the length and got a perfect fit. This girl is tiny. In August she'll be 4. I'll probably be able to make her a fall version with just an inch or so added to the length and not have to re-trace the pattern.
The zipper I had to special order online from Zipper stop because I couldn't find a good match locally. The button peeking out on the left I happened to have in my stash. It is connected to the other side of the collar with a thread loop. The lining I did in white cotton sheeting from Hancock's fabrics. No pictures of that, though. It's too overcast today to take any interior shots.
This was such a fun little dress to make! I am still in a sewing funk for making stuff for myself but have a number of garments I want to make for her lined up. If you like seeing kids clothes on my blog then you are in for a treat. If not, well, sorry. I've got to go where my mojo takes me.
Friday, January 17, 2014
Burda 9-10-116 - Mustard yellow wool pencil skirt
It's been over a month since I last posted anything due to the disappearance of my sewing mojo. I think this happened to me a few years ago around the same time. Maybe I'm just needing a break after the business of the holidays. Well, I have managed to make a winter skirt using a pattern I've previously sewn that didn't require the making of a muslin.
After sewing my red leather version, I had no intention of ever making another one. The style is pretty unique. However, that other version is one of those skirts that migrates around my body every time I wear it. You know that kind of skirt, right? I don't know if I got the lining off grain or what. Also I didn't have enough leather to make the back vents so I have to take tiny steps when I'm walking. Getting in and out of the car is difficult. Consequentially it is now living in my "needs attention" area of the closet. Someday I hope to reuse the leather for another garment. Since I still really like the style of the skirt, I decided to remake it in a yellow wool crepe

This fabric was an online purchase several years ago. I can't remember exactly where I got it from. The lining (not pictured) is some inexpensive polyester stuff bought because it perfectly matched the wool crepe. Yellow is horrible about show-through, so I knew I had to match the color precisely. The matching zipper was ordered from Zipperstop.


The seamlines show up on this fabric much better then on the leather. At the back you can see the double kick pleats, which make this version much easier to move around in.
The pegged shape of this skirt won't fit over my dressform, so here are some close-ups on me:


I'm really happy to add this pop of color to my winter wardrobe.
After sewing my red leather version, I had no intention of ever making another one. The style is pretty unique. However, that other version is one of those skirts that migrates around my body every time I wear it. You know that kind of skirt, right? I don't know if I got the lining off grain or what. Also I didn't have enough leather to make the back vents so I have to take tiny steps when I'm walking. Getting in and out of the car is difficult. Consequentially it is now living in my "needs attention" area of the closet. Someday I hope to reuse the leather for another garment. Since I still really like the style of the skirt, I decided to remake it in a yellow wool crepe
This fabric was an online purchase several years ago. I can't remember exactly where I got it from. The lining (not pictured) is some inexpensive polyester stuff bought because it perfectly matched the wool crepe. Yellow is horrible about show-through, so I knew I had to match the color precisely. The matching zipper was ordered from Zipperstop.
The seamlines show up on this fabric much better then on the leather. At the back you can see the double kick pleats, which make this version much easier to move around in.
The pegged shape of this skirt won't fit over my dressform, so here are some close-ups on me:
I'm really happy to add this pop of color to my winter wardrobe.
Sunday, November 3, 2013
Jalie 2921 - Short sleeve yellow, taupe & black scarf-collar top
I needed a quick and easy project after my boucle jacket, so I picked a simple knit top. This pattern was all the rage several years ago, and was even awarded a "best pattern of 2010" award at patternreview.com. However, I have a bit of an ornery streak in me, and I never like to do what everyone else is doing. It's a good and bad trait, depending on the situation. After hanging on to this pattern for multiple years, I have finally stitched it up.

This fabric is some sort of mystery knit I bought off ebay two or more years ago. I think it's a cotton/viscose blend. I liked the yellow background but was completely surprised when it arrived in such a large scale. Originally I'd wanted to tie the ends in a bow, but that completely disappears into the busy print, so I'll be wearing it straight down like a true scarf. I wore this outfit shoe shopping this afternoon and the scarf has great movement. It blew off to the sides while I walked and I felt tres chic!

I used my twin needle and black thread to finish all the hems. This top was so quick that I completed it in just one day of sporadic sewing. That's lightning speed for me! I cut a straight size T with no alterations.

This top was actually a test to gauge the fit. I've a nice ivory silk jersey that I want to use for the tied version, but didn't want to waste my fabric if it didn't turn out to my liking. It turns out I like this quite a bit, and I'll probably have the next version out before the end of the month!
Subscribe to:
Posts (Atom)